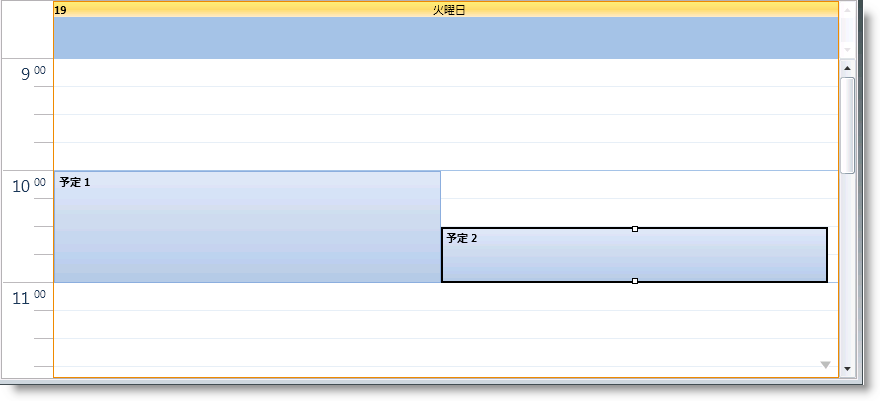
xmlns:ig="http://schemas.infragistics.com/xaml"XamSchedule によってスケジュール データを表示および編集できます。このデータは異なるタイプの アクティビティ (この詳細なガイドでは 予定) で構成されており、あらゆるアクティビティは所有するリソースと所有するカレンダーを持っています。ビューに予定を表示するために (dayView コントロールは以下のコードで使用される)、 ListScheduleDataConnector が使用されデータを XamScheduleDataManager に移植します。
プロシージャー コードで xamSchedule コントロールとデータ マネージャーを定義する方法を学習します。
Microsoft® WPF® ページを作成します。
以下の NuGet パッケージ参照をアプリケーションに追加します。
Infragistics.WPF.Schedules
Infragistics.WPF.Schedules.Dialogs
ページを作成し、xamSchedule の名前空間の宣言を追加します。
XAML の場合:
xmlns:ig="http://schemas.infragistics.com/xaml"Visual Basic の場合:
Imports Infragistics.Controls.SchedulesC# の場合:
using Infragistics.Controls.Schedules;XAML ページのメインのグリッド タグを PageRoot と名付けることにより、コードビハインドからアクセスできます。
XAML の場合:
<Grid Name="PageRoot">
</Grid>
リソースとカレンダーをコードビハインドに作成します。
Visual Basic の場合:
Dim resources As New ObservableCollection(Of Resource)()
Dim resAmanda As New Resource() With { _
        Key .Id = "own1", _
        Key .Name = "Amanda" _
}
resources.Add(resAmanda)
Dim calendars As New ObservableCollection(Of ResourceCalendar)()
Dim calAmanda As New ResourceCalendar() With { _
        Key .Id = "cal1", _
        Key .OwningResourceId = "own1" _
}
calendars.Add(calAmanda)
C# の場合:
ObservableCollection<Resource> resources =
    new ObservableCollection<Resource>();
Resource resAmanda = new Resource() { Id = "own1", Name = "Amanda" };
resources.Add(resAmanda);
ObservableCollection<ResourceCalendar> calendars =
    new ObservableCollection<ResourceCalendar>();
ResourceCalendar calAmanda = new ResourceCalendar()
{
    Id = "cal1",
    OwningResourceId = "own1"
};
calendars.Add(calAmanda);
注: カレンダーの所有するリソース ID はリソース ID と同じです。
その中に 2 つの項目がある予定のリストを作成します。
Visual Basic の場合:
Dim appointments As New ObservableCollection(Of Appointment)()
        ' タイムゾーンはこのスニペットで設定しないため、
        ' 日付をグリニッジ標準時へ変換します
Dim app1 As New Appointment() With { _
        Key .Id = "t1", _
        Key .OwningResourceId = "own1", _
        Key .OwningCalendarId = "cal1", _
        Key .Subject = "Appointment 1", _
        Key .Description = "My first appointment", _
        Key .Start = DateTime.Today.AddHours(9).AddMinutes(12).
            ToUniversalTime(), _
        Key .[End] = DateTime.Today.AddHours(11).AddMinutes(42).
            ToUniversalTime() _
}
appointments.Add(app1)
        ' 日付を標準時に変更します
        ' このコードでタイム ゾーンが設定されていないからです
Dim app2 As New Appointment() With { _
        Key .Id = "t2", _
        Key .OwningResourceId = "own1", _
        Key .OwningCalendarId = "cal1", _
        Key .Subject = "Appointment 2", _
        Key .Description = "My second appointment", _
        Key .Start = DateTime.Today.AddHours(10).AddMinutes(12).
            ToUniversalTime(), _
        Key .[End] = DateTime.Today.AddHours(11).AddMinutes(42).
            ToUniversalTime() _
}
appointments.Add(app2)
C# の場合:
ObservableCollection<Appointment> appointments =
    new ObservableCollection<Appointment>();
Appointment app1 = new Appointment()
{
    Id = "t1",
    OwningResourceId = "own1",
    OwningCalendarId = "cal1",
    Subject = "Appointment 1",
    Description = "My first appointment",
    // タイムゾーンはこのスニペットで設定しないため、
    // 日付をグリニッジ標準時へ変換します
    Start = DateTime.Today.AddHours(9).AddMinutes(12).ToUniversalTime(),
    End = DateTime.Today.AddHours(11).AddMinutes(42).ToUniversalTime()
};
appointments.Add(app1);
Appointment app2 = new Appointment()
{
    Id = "t2",
    OwningResourceId = "own1",
    OwningCalendarId = "cal1",
    Subject = "Appointment 2",
    Description = "My second appointment",
    // タイムゾーンはこのスニペットで設定しないため、
    // 日付をグリニッジ標準時へ変換します
    Start = DateTime.Today.AddHours(10).AddMinutes(12).ToUniversalTime(),
    End = DateTime.Today.AddHours(11).AddMinutes(42).ToUniversalTime()
};
appointments.Add(app2);
注: リソースとカレンダーは前の手順で定義したため、2 つの予定のリソース id とカレンダー id は同じです。
コードビハインドを使用して ListScheduleDataConnector を追加、作成する場合、XAML ページのメイン グリッドまたはページコンストラクターが必要です。リソース リスト、カレンダー、予定をアタッチします。
XAML の場合:
<ig:ListScheduleDataConnector x:Name="dataConnector" />Visual Basic の場合:
Dim dataConnector As New ListScheduleDataConnector()
dataConnector.ResourceItemsSource = resources
dataConnector.ResourceCalendarItemsSource = calendars
dataConnector.AppointmentItemsSource = appointments
C# の場合:
ListScheduleDataConnector dataConnector =
    new ListScheduleDataConnector();
dataConnector.ResourceItemsSource = resources;
dataConnector.ResourceCalendarItemsSource = calendars;
dataConnector.AppointmentItemsSource = appointments;
xamScheduleDataManager を作成し、DataConnector プロパティをデータ コネクターにバインドします。CalendarGroups コレクションにひとつの CalendarGroup を作成します。InitialCalendarIds プロパティには、表示されるカレンダーを指定するコンマで区切られた値を含むことができます。メインのカレンダーが表示対象である場合、フォーマットは owningResourceId[calendarId] または owningResourceId です。
例: InitialCalendarIds=“own2, own1[cal1]”
XAML の場合:
<ig:XamScheduleDataManager x:Name="dataManager"
             DataConnector="{Binding ElementName=dataConnector}">
     <ig:XamScheduleDataManager.CalendarGroups>
         <ig:CalendarGroup InitialCalendarIds="own1[cal1]"/>
     </ig:XamScheduleDataManager.CalendarGroups>
</ig:XamScheduleDataManager>
カレンダー グループを作成し、初期カレンダーを設定します。
Visual Basic の場合:
Dim dataManager As New XamScheduleDataManager()
dataManager.DataConnector = dataConnector
Dim calGroups As CalendarGroupCollection = _
    dataManager.CalendarGroups
Dim calGroup As New CalendarGroup()
calGroup.InitialCalendarIds = "own1[cal1]"
calGroups.Add(calGroup)
C# の場合:
XamScheduleDataManager dataManager = new XamScheduleDataManager();
dataManager.DataConnector = dataConnector;
CalendarGroupCollection calGroups = dataManager.CalendarGroups;
CalendarGroup calGroup = new CalendarGroup();
calGroup.InitialCalendarIds = "own1[cal1]";
calGroups.Add(calGroup);
注: 複数のカレンダーが関連付けられているリソースがあることに注意してください。そのため、どのカレンダーを使用するのかを指定します。カレンダーを指定しない場合、カレント ユーザーが第一に使用されます。
最後に、xamSchedule DayView を作成し、データ マネージャーを添付して、手順 4 で名前を指定した「PageRoot」グリッドに追加します。
XAML の場合:
<ig:XamDayView x:Name="dayView"
DataManager="{Binding ElementName=dataManager}" />
Visual Basic の場合:
Dim dayView As New XamDayView()
dayView.DataManager = dataManager
Me.PageRoot.Children.Add(dayView)
C# の場合:
XamDayView dayView = new XamDayView();
dayView.DataManager = dataManager;
this.PageRoot.Children.Add(dayView);
アプリケーションを保存して実行します。作成したばかりの予定を見つけるためにビューを下にスクロールします。
