
このトピックは、コード例を示して、Motion Framework を XamDataChart コントロールで使用してチャートをアニメーション化する方法を説明します。一般的な実装とカスタムの実装の両方の手順が提供されます。
トピックは以下のとおりです。
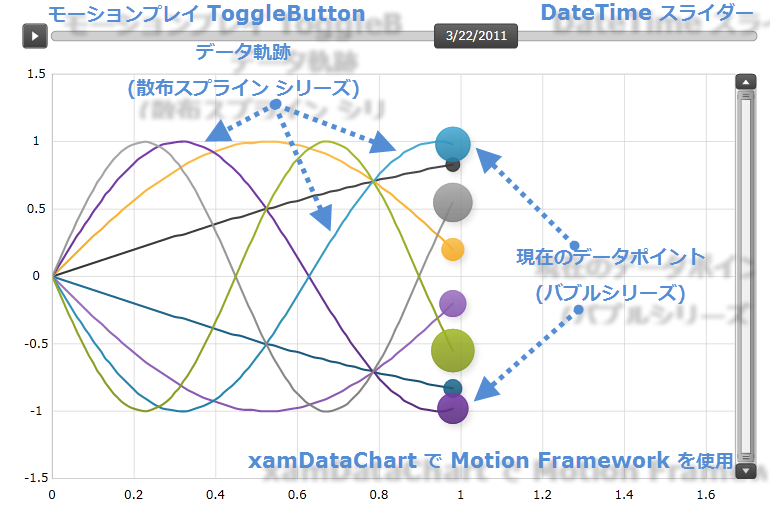
Motion Framework によって、XamDataChart コントロールで常にデータの変更をアニメーション化することができ、アニメーションによって、データについて「ストーリーを語る」ようなユーザー エクスペリエンスを創出します。
図 1: Motion Framework で XamDataChart コントロールが 6 つのデータソースをアニメーション化する様子
Motion Framework は、Series オブジェクトの TransitionDuration および TransitionEasingFunction プロパティによって管理されます。これらのプロパティは、Data Chart のすべてのタイプのシリーズで使用できます。
表 1: Motion Framework のプロパティ
Motion Framework は、XamDataChart コントロールにおいて次の制限があります。データ変更の結果としての軸の範囲が変化した場合、アニメーションは開始されません。
一般的な Motion Framework の実装では、XamDataChart のデータ バインド アニメーションを完全に制御できます。ただし、この実装では XamDataChart コントロールで個別に各シリーズを構成し、データを更新する方法を提供することが求められます。XamDataChart で Motion Framework を使用する方法
TransitionDuration プロパティを設定します。TransitionDuration プロパティは、前の値から次の値へシリーズのポイントがシフトする時間を制御します。アニメーションを使用するシリーズで、なめらかにシリーズが遷移する期間にこのプロパティを設定します。0.5 秒がほとんどの場合に適切な選択です。
TransitionEasingFunction プロパティを希望の easing 関数またはシリーズの変形に使用されるリニア easing 関数に設定します。
以下のコードは、ScatterLineSeries で TransitionDuration TransitionEasingFunction プロパティを設定する方法を示します。このロジック例は、XamDataChart でサポートされる他のタイプにも適用できます。
XAML の場合:
<ig:XamDataChart x:Name="DataChart" >
      <ig:XamDataChart.Series>
            <ig:ScatterLineSeries TransitionDuration="0:0:0.5">
                  <ig:ScatterLineSeries.TransitionEasingFunction>
                        <CubicEase EasingMode="EaseOut" />
                  </ig:ScatterLineSeries.TransitionEasingFunction>
            </ig:ScatterLineSeries >
      </ig:XamDataChart.Series>
</ig:XamDataChart>
Visual Basic の場合:
Imports System.Windows.Media.Animation
Imports Infragistics.Controls.Charts
' ...
Dim series As New ScatterLineSeries()
series.TransitionDuration = TimeSpan.FromSeconds(0.5)
series.TransitionEasingFunction = New CubicEase() With { .EasingMode = EasingMode.EaseOut }
Me.DataChart.Series.Add(series)
C# の場合:
using System.Windows.Media.Animation;
using Infragistics.Controls.Charts;
// ...
ScatterLineSeries series = new ScatterLineSeries();
series.TransitionDuration = TimeSpan.FromSeconds(0.5);
series.TransitionEasingFunction = new CubicEase {EasingMode = EasingMode.EaseOut};
this.DataChart.Series.Add(series);
変更時にデータがチャートに通知することを確認します。たとえば、チャートにバインドされた項目が INotifyPropertyChanged インターフェイスを実装する場合、それらのプロパティのひとつを変更すると、チャートに通知し、変更がアニメーション化されます。コレクションは、the INotifyCollectionChanged インターフェイスを実装する場合、コレクションの追加、削除、変更もアニメーション化されます。
以下のコードは、項目が追加、削除、置き換えされる時、およびそれらの値が変更される時にデータ チャートに通知するデータの例を示します。
Visual Basic の場合:
Imports System.Collections.ObjectModel
Imports System.ComponentModel
''' <summary>
''' データ ポイントの監視可能なコレクションを表します
''' </summary>
Public Class ObservableDataSource
    Inherits ObservableCollection(Of ObservableDataPoint)
End Class
''' <summary>
''' 監視可能なデータ ポイントを表します
''' </summary>
Public Class ObservableDataPoint
    Implements INotifyPropertyChanged
#Region "Properties"
    Private _x As Double
    Public Property X() As Double
        Get
            Return _x
        End Get
        Set(ByVal value As Double)
            If _x = value Then Return
            _x = value
            OnPropertyChanged("X")
        End Set
    End Property
    Private _y As Double
    Public Property Y() As Double
        Get
            Return _y
        End Get
        Set(ByVal value As Double)
            If _y = value Then Return
            _y = value
            OnPropertyChanged("Y")
        End Set
    End Property
#End Region
#Region "INotifyPropertyChanged"
    Public Event PropertyChanged As PropertyChangedEventHandler Implements INotifyPropertyChanged.PropertyChanged
    Protected Sub OnPropertyChanged(ByVal propertyName As String)
        Me.OnPropertyChanged(New PropertyChangedEventArgs(propertyName))
    End Sub
    Protected Sub OnPropertyChanged(ByVal propertyChangedEventArgs As PropertyChangedEventArgs)
        RaiseEvent PropertyChanged(Me, propertyChangedEventArgs)
    End Sub
#End Region
End Class
C# の場合:
using System.Collections.ObjectModel;
using System.ComponentModel;
/// <summary>
///データ ポイントの監視可能なコレクションを表します
/// </summary>
public class ObservableDataSource : ObservableCollection<ObservableDataPoint>
{ }
/// <summary>
/// 監視可能なデータ ポイントを表します
/// </summary>
public class ObservableDataPoint : INotifyPropertyChanged
{
    #region Porperties
    private double _x;
    private double _y;
    public double X
    {
        get { return _x; }
        set { if (_x == value) return; _x = value; this.OnPropertyChanged("X"); }
    }
    public double Y
    {
        get { return _y; }
        set { if (_y == value) return; _y = value; this.OnPropertyChanged("Y"); }
    }
    #endregion
    #region Event Handlers
    public event PropertyChangedEventHandler PropertyChanged;
    protected void OnPropertyChanged(string propertyName)
    {
        this.OnPropertyChanged(new PropertyChangedEventArgs(propertyName));
    }
    protected void OnPropertyChanged(PropertyChangedEventArgs propertyChangedEventArgs)
    {
        PropertyChangedEventHandler handler = this.PropertyChanged;
        if (handler != null)
            handler(this, propertyChangedEventArgs);
    }
    #endregion
}
データを更新する頻度は、TransitionDuration 期間のみであるのが理想です。データをより頻繁に更新する場合は、チャートのアニメーションは円滑になりますが、更新された値を表示するためにリフレッシュできなくなります。必要な補間を実行するための時間が十分にないため、それらの値を解釈できなくなります。
以下のコードは、XamDataChart でアニメーション化されたデータで更新をトリガーするためにタイマーを使用する方法を示します。
Visual Basic の場合:
Imports System.Windows.Threading
Imports Infragistics.Controls.Charts
' ...
Protected ObservableDataSource As New ObservableDataSource()
' ...
Private Sub Initialize()
    ' ...
    Me.Chart.Series(0).YMemberPath = "X"
    Me.Chart.Series(0).XMemberPath = "Y"
    Me.Chart.Series(0).ItemsSource = Me.DataSource
    ' ...
    Dim dataUpdateTimer As New DispatcherTimer()
    dataUpdateTimer.Interval = TimeSpan.FromSeconds(0.5)
    AddHandler dataUpdateTimer.Tick, AddressOf OnDataUpdateTimerTick
    dataUpdateTimer.Start()
End Sub
Private Sub OnDataUpdateTimerTick(sender As Object, e As EventArgs)
    Dim newDataPoint As New ObservableDataPoint()
    ' 最初の項目を削除します
    Me.DataSource.RemoveAt(0)
    ' 最後に新しい項目を追加します
    Me.DataSource.Add(newDataPoint)
End Sub
C# の場合:
using System.Windows.Threading;
using Infragistics.Controls.Charts;
// ...
protected ObservableDataSource DataSource = new ObservableDataSource();
// ...
private void Initialize()
{
     // ...
     this.Chart.Series[0].YMemberPath = "X";
     this.Chart.Series[0].XMemberPath = "Y";
     this.Chart.Series[0].ItemsSource = this.DataSource;
     // ...
     DispatcherTimer dataUpdateTimer = new DispatcherTimer();
     dataUpdateTimer.Interval = TimeSpan.FromSeconds(0.5);
     dataUpdateTimer.Tick += OnDataUpdateTimerTick;
     dataUpdateTimer.Start();
}
private void OnDataUpdateTimerTick(object sender, EventArgs e)
{
     ObservableDataPoint newDataPoint = new ObservableDataPoint();
     this.DataSource.RemoveAt(0);        // 最初の項目を削除します
     this.DataSource.Add(newDataPoint);  // 最後に新しい項目を追加します
}
XamDataChart を使用した他の方法として、以下の機能のあるカスタム MotionFrameworkManager オブジェクトを介した方法があります。
Motion Framework のよりシンプルな構成と操作
複数のデータ ソースに対するデータ更新の処理と同期
データ アニメーションを開始/停止し、Motion Framework の現在の状態を表示するコントロールによるインタラクティブなエクスペリエンス
データ変更の再生
Motion Framework マネージャー オブジェクトをダウンロードして使用できます。以下のセクションは、Motion Framework のマネージャーを使用する方法を説明します。
最終結果は、上記の図 1 に示されます。
ToggleButton コントロールと Slider コントロールをルート レイアウトに追加します。
このボタンは、Motion Framework を使用してデータにおける変更のアニメーション再生を制御します。
XAML の場合:
<Grid x:Name="LayoutRoot" >
      <Grid.RowDefinitions>
            <RowDefinition Height="auto" />
            <RowDefinition Height="*" />
      </Grid.RowDefinitions>
      <Grid Grid.Row="0"  >
      <Grid.ColumnDefinitions>
                <ColumnDefinition Width="auto" />
                <ColumnDefinition Width="*" />
      </Grid.ColumnDefinitions>
      <ToggleButton x:Name="MotionPlayToggleButton" Grid.Column="0" >
      </ToggleButton>
      <Slider x:Name="MotionSlider" Grid.Column="1" Value="{Binding CurrentElementShown}" >
      </Slider>
      </Grid>
      < !--TODO: xamDataChart コントロールを追加します -->
</Grid>
水平軸および垂直軸を含む XamDataChart コントロールを追加します。
XAML の場合:
<Grid x:Name="LayoutRoot" >
        <!-- ...-->
        <ig:XamDataChart x:Name="DataChart"
                         HorizontalZoomable="True"
                         HorizontalZoombarVisibility="Visible"
                         VerticalZoomable="True"
                         VerticalZoombarVisibility="Visible">
            <ig:XamDataChart.Axes>
                <ig:NumericXAxis x:Name="axisX" >
                </ig:NumericXAxis>
                <ig:NumericYAxis x:Name="axisY" >
                </ig:NumericYAxis>
            </ig:XamDataChart.Axes>
        </ig:XamDataChart>
</Grid>
MotionFrameworkManager オブジェクトをプロジェクトに追加します。
MotionFrameworkManager メンバーと DataSources メンバーを宣言します。
Visual Basic の場合:
Imports System
Imports System.Windows.Media.Animation
Imports System.Collections.Generic
Imports Infragistics.Controls.Charts
Imports Infragistics.Samples.Common.Framework
' ...
Protected MotionFrameworkManger As MotionFrameworkManger
Protected DataSources As Dictionary(Of Integer, IList)
C# の場合:
using System;
using System.Windows.Media.Animation;
using System.Collections.Generic;
using Infragistics.Controls.Charts;
using Infragistics.Samples.Common.Framework;
// ...
protected MotionFrameworkManger MotionFrameworkManger;
protected Dictionary<int, IList> DataSources;
コード ビハインドで MotionFrameworkManager オブジェクトのインスタンスを作成します。
Visual Basic の場合:
Me.MotionFrameworkManger = New MotionFrameworkManger()
C# の場合:
this.MotionFrameworkManger = new MotionFrameworkManger();
MotionFrameworkManager オブジェクトを構成します。
TransitionFunction プロパティを ExponentialEase アニメーション関数に設定します。 TransitionDuration プロパティを 1 秒に設定します。 DataUpdateInterval プロパティを 1 秒に設定します。
Visual Basic の場合:
Me.MotionFrameworkManger.TransitionFunction = New ExponentialEase() With { .EasingMode = EasingMode.EaseInOut }
Me.MotionFrameworkManger.TransitionDuration = TimeSpan.FromMilliseconds(1000)
Me.MotionFrameworkManger.DataUpdateInterval = TimeSpan.FromMilliseconds(1000)
C# の場合:
this.MotionFrameworkManger.TransitionFunction = new ExponentialEase { EasingMode = EasingMode.EaseInOut };
this.MotionFrameworkManger.TransitionDuration = TimeSpan.FromMilliseconds(1000);
this.MotionFrameworkManger.DataUpdateInterval = TimeSpan.FromMilliseconds(1000);
アニメーション化される固有のデータ ソースをバインドするか、DataSourceGenerator を使用して、ランダム データを生成します。
Visual Basic の場合:
Me.DataSources = DataSourceGenerator.GetDataSources(8, 160)
' データ ソースを設定します
Me.MotionFrameworkManger.DataSources = Me.DataSources
' チャートで使用されるバインドされたオブジェクトのプロパティを設定します
Me.MotionFrameworkManger.SeriesRadiusMemberPath = MotionDataPoint.PropertyNameValueR
Me.MotionFrameworkManger.SeriesXMemberPath = MotionDataPoint.PropertyNameValueX
Me.MotionFrameworkManger.SeriesYMemberPath = MotionDataPoint.PropertyNameValueY
Me.MotionFrameworkManger.SeriesTimeMemberPath = MotionDataPoint.PropertyNameValueDateTime
C# の場合:
this.DataSources = DataSourceGenerator.GetDataSources(8, 160);
// データ ソースを設定します
this.MotionFrameworkManger.DataSources = this.DataSources;
// チャートで使用されるバインドされたオブジェクトのプロパティを設定します
this.MotionFrameworkManger.SeriesRadiusMemberPath = MotionDataPoint.PropertyNameValueR;
this.MotionFrameworkManger.SeriesXMemberPath = MotionDataPoint.PropertyNameValueX;
this.MotionFrameworkManger.SeriesYMemberPath = MotionDataPoint.PropertyNameValueY;
this.MotionFrameworkManger.SeriesTimeMemberPath = MotionDataPoint.PropertyNameValueDateTime;
XamDataChart をバインドし、Motion Framework のマネージャーに軸をマッピングします。。
Visual Basic の場合:
Me.MotionFrameworkManger.Chart = Me.DataChart
Me.MotionFrameworkManger.XAxisName = "axisX"
Me.MotionFrameworkManger.YAxisName = "axisY"
C# の場合:
this.MotionFrameworkManger.Chart = this.DataChart;
this.MotionFrameworkManger.XAxisName = "axisX";
this.MotionFrameworkManger.YAxisName = "axisY";
最初の手順で作成した Slider コントロールを MotionFrameworkManager の DateTimeSlider プロパティにバインドします。
Visual Basic の場合:
Me.MotionFrameworkManger.DateTimeSlider = Me.MotionSlider
C# の場合:
this.MotionFrameworkManger.DateTimeSlider = this.MotionSlider;
現在の DataContext を MotionFrameworkManager オブジェクトに設定します。
Visual Basic の場合:
Me.DataContext = Me.MotionFrameworkManger
C# の場合:
this.DataContext = this.MotionFrameworkManger;
MotionFrameworkManager オブジェクトを初期化します。
Visual Basic の場合:
Me.MotionFrameworkManger.Initialize()
C# の場合:
this.MotionFrameworkManger.Initialize();
Motion Framework の再生アニメーションを切り替えるボタンの Click イベントのイベント ハンドラーを追加します。
Visual Basic の場合:
Imports System.Windows
' ...
AddHandler MotionPlayToggleButton.Click, AddressOf OnMotionPlayButtonClick
' ...
Private Sub OnMotionPlayButtonClick(sender As Object, e As RoutedEventArgs)
    If Not Me.MotionFrameworkManger.IsPlaying Then
        Me.MotionFrameworkManger.Play()
        Me.MotionPlayToggleButton.IsChecked = True
    Else
        Me.MotionFrameworkManger.Pause()
        Me.MotionPlayToggleButton.IsChecked = False
    End If
End Sub
C# の場合:
using System.Windows;
// ...
this.MotionPlayToggleButton.Click += OnMotionPlayButtonClick;
// ...
private void OnMotionPlayButtonClick(object sender, RoutedEventArgs e)
{
    if (!this.MotionFrameworkManger.IsPlaying)
    {
        this.MotionFrameworkManger.Play();
        this.MotionPlayToggleButton.IsChecked = true;
    }
    else
    {
        this.MotionFrameworkManger.Pause();
        this.MotionPlayToggleButton.IsChecked = false;
    }
}
プロジェクトを保存します。
(オプション) 結果を確認します。コードを正しく実装した場合には、アニメーションされたチャートは上記の図 1 に示すように表示されるはずです。