Imports Infragistics.UltraGauge.Resources

このチュートリアルは、コードを使用してラジアル ゲージを作成するプロセスを説明します。この詳細なガイドを完了すると、針マーカーの付いたラジアル ゲージが作成されます。
コードを使用してラジアル ゲージを作成するには、次の手順に従ってください。
コードの記述を開始する前にコード ビハインドに using/Imports のディレクティブを配置します。そうすれば、メンバは完全に記述された名前を常にタイプする必要がなくなります。
Visual Basic の場合:
Imports Infragistics.UltraGauge.Resources
C# の場合:
using Infragistics.UltraGauge.Resources;
以下のクラスをインスタンス化します。
Visual Basic の場合:
Dim ultraGauge1 As New Infragistics.Win.UltraWinGauge.UltraGauge()
Dim myRadialGauge As New RadialGauge()
Dim myScale As New RadialGaugeScale()
Dim numericAxis1 As New NumericAxis()
Dim myNeedle As New RadialGaugeNeedle()
Dim mySolidFillBrushElement As New SolidFillBrushElement()
Dim mySolidFillBrushElementMajor As New SolidFillBrushElement()
Dim mySolidFillBrushElementMinor As New SolidFillBrushElement()
Dim mySolidFillBrushElementMinorStroke As New SolidFillBrushElement()
Dim myStrokeElement As New StrokeElement()
Dim mySolidFillBrushElement2 As New SolidFillBrushElement()
Dim mySimpleGradientBrushElement As New SimpleGradientBrushElement()
Dim mySolidFillBrushElement1 As New SolidFillBrushElement()
C# の場合:
Infragistics.Win.UltraWinGauge.UltraGauge ultraGauge1 = new Infragistics.Win.UltraWinGauge.UltraGauge();
RadialGauge myRadialGauge = new RadialGauge();
RadialGaugeScale myScale = new RadialGaugeScale();
NumericAxis numericAxis1 = new NumericAxis();
RadialGaugeNeedle myNeedle = new RadialGaugeNeedle();
SolidFillBrushElement mySolidFillBrushElement = new SolidFillBrushElement();
SolidFillBrushElement mySolidFillBrushElementMajor = new SolidFillBrushElement();
SolidFillBrushElement mySolidFillBrushElementMinor = new SolidFillBrushElement();
SolidFillBrushElement mySolidFillBrushElementMinorStroke = new SolidFillBrushElement();
StrokeElement myStrokeElement = new StrokeElement();
SolidFillBrushElement mySolidFillBrushElement2 = new SolidFillBrushElement();
SimpleGradientBrushElement mySimpleGradientBrushElement = new SimpleGradientBrushElement();
SolidFillBrushElement mySolidFillBrushElement1 = new SolidFillBrushElement();
Dial プロパティの背景色を黒を設定します。
Visual Basic の場合:
mySolidFillBrushElement.Color = System.Drawing.Color.Black
myRadialGauge.Dial.BrushElement = mySolidFillBrushElement
C# の場合:
mySolidFillBrushElement.Color = System.Drawing.Color.Black;
myRadialGauge.Dial.BrushElement = mySolidFillBrushElement;
Margin プロパティを設定します。
x = 10
y = 10
上 = 10
下 = 10
単位 = ピクセル
Visual Basic の場合:
myRadialGauge.Margin = New Margin(10, 10, 10, 10, Measure.Pixels)
C# の場合:
myRadialGauge.Margin = new Margin(10, 10, 10, 10, Measure.Pixels);
以下の Axis プロパティを設定して、軸をスケールに追加します。
EndValue = 100
タイプ = 数値
Visual Basic の場合:
numericAxis1.EndValue = 100
myScale.Axes.Add(numericAxis1)
C# の場合:
numericAxis1.EndValue = 100;
myScale.Axes.Add(numericAxis1);
以下の Scale プロパティを設定します。
StartValue — 135
EndValue — 405
Visual Basic の場合:
myScale.EndAngle = 405
myScale.StartAngle = 135
C# の場合:
myScale.EndAngle = 405;
myScale.StartAngle = 135;
以下の Label プロパティを設定します。
色 — 白
範囲 — 55
フォント — Arial
頻度 — 20
方向 — 水平
SpanMaximum — 18
Visual Basic の場合:
mySolidFillBrushElement1.Color = System.Drawing.Color.White
myScale.Labels.BrushElement = mySolidFillBrushElement1
myScale.Labels.Extent = 65
myScale.Labels.Font = New System.Drawing.Font("Arial", 14.0F, System.Drawing.FontStyle.Bold, System.Drawing.GraphicsUnit.Pixel)
myScale.Labels.Frequency = 20
myScale.Labels.Orientation = Infragistics.UltraGauge.Resources.RadialLabelOrientation.Horizontal
myScale.Labels.SpanMaximum = 18
C# の場合:
mySolidFillBrushElement1.Color = System.Drawing.Color.White;
myScale.Labels.BrushElement = mySolidFillBrushElement1;
myScale.Labels.Extent = 65;
myScale.Labels.Font = new System.Drawing.Font("Arial", 14F, System.Drawing.FontStyle.Bold, System.Drawing.GraphicsUnit.Pixel);
myScale.Labels.Frequency = 20;
myScale.Labels.Orientation = Infragistics.UltraGauge.Resources.RadialLabelOrientation.Horizontal;
myScale.Labels.SpanMaximum = 18;
以下の主の Tickmark プロパティを設定します。
色 — 189, 189, 189
EndExtent — 79
EndWidth — 3
頻度 — 10
StartExtent — 67
StartWidth — 3
Visual Basic の場合:
mySolidFillBrushElementMajor.Color = System.Drawing.Color.FromArgb(CInt(CByte(189)), CInt(CByte(189)), CInt(CByte(189)))
myScale.MajorTickmarks.BrushElement = mySolidFillBrushElementMajor
myScale.MajorTickmarks.EndExtent = 95
myScale.MajorTickmarks.EndWidth = 3
myScale.MajorTickmarks.Frequency = 10
myScale.MajorTickmarks.StartExtent = 85
myScale.MajorTickmarks.StartWidth = 3
C# の場合:
mySolidFillBrushElementMajor.Color = System.Drawing.Color.FromArgb(((int)(((byte)(189)))), ((int)(((byte)(189)))), ((int)(((byte)(189)))));
myScale.MajorTickmarks.BrushElement = mySolidFillBrushElementMajor;
myScale.MajorTickmarks.EndExtent = 95;
myScale.MajorTickmarks.EndWidth = 3;
myScale.MajorTickmarks.Frequency = 10;
myScale.MajorTickmarks.StartExtent = 85;
myScale.MajorTickmarks.StartWidth = 3;
以下の副の Tickmark プロパティを設定します。
色 — 240, 240, 240
EndExtent — 78
EndWidth — 1
頻度 — 2
StartExtent — 73
次に目盛に対して以下の Stroke プロパティを設定します。
色 — 135, 135, 135
radialScale1 を Scales コレクションに追加します。
Visual Basic の場合:
mySolidFillBrushElementMinor.Color = System.Drawing.Color.FromArgb(CInt(CByte(240)), CInt(CByte(240)), CInt(CByte(240)))
myScale.MinorTickmarks.BrushElement = mySolidFillBrushElementMinor
myScale.MinorTickmarks.EndExtent = 90
myScale.MinorTickmarks.EndWidth = 1
myScale.MinorTickmarks.Frequency = 2
myScale.MinorTickmarks.StartExtent = 85
mySolidFillBrushElementMinorStroke.Color = System.Drawing.Color.FromArgb(CInt(CByte(135)), CInt(CByte(135)), CInt(CByte(135)))
myStrokeElement.BrushElement = mySolidFillBrushElementMinorStroke
myScale.MinorTickmarks.StrokeElement = myStrokeElement
C# の場合:
mySolidFillBrushElementMinor.Color = System.Drawing.Color.FromArgb(((int)(((byte)(240)))), ((int)(((byte)(240)))), ((int)(((byte)(240)))));
myScale.MinorTickmarks.BrushElement = mySolidFillBrushElementMinor;
myScale.MinorTickmarks.EndExtent = 90;
myScale.MinorTickmarks.EndWidth = 1;
myScale.MinorTickmarks.Frequency = 2;
myScale.MinorTickmarks.StartExtent = 85;
mySolidFillBrushElementMinorStroke.Color = System.Drawing.Color.FromArgb(((int)(((byte)(135)))), ((int)(((byte)(135)))), ((int)(((byte)(135)))));
myStrokeElement.BrushElement = mySolidFillBrushElementMinorStroke;
myScale.MinorTickmarks.StrokeElement = myStrokeElement;
以下の Anchor プロパティを設定します。
StartColor --Gray
EndColor — WhiteSmoke
グラデーション スタイル — Backward Diagonal
RadiusMeasure — Percent
次に針を Markers コレクションに追加します。
Visual Basic の場合:
myNeedle.Anchor.BrushElement = mySimpleGradientBrushElement
mySimpleGradientBrushElement.EndColor = System.Drawing.Color.WhiteSmoke
mySimpleGradientBrushElement.GradientStyle = Infragistics.UltraGauge.Resources.Gradient.BackwardDiagonal
mySimpleGradientBrushElement.StartColor = System.Drawing.Color.Gray
myNeedle.Anchor.RadiusMeasure = Infragistics.UltraGauge.Resources.Measure.Percent
C# の場合:
myNeedle.Anchor.BrushElement = mySimpleGradientBrushElement;
mySimpleGradientBrushElement.EndColor = System.Drawing.Color.WhiteSmoke;
mySimpleGradientBrushElement.GradientStyle = Infragistics.UltraGauge.Resources.Gradient.BackwardDiagonal;
mySimpleGradientBrushElement.StartColor = System.Drawing.Color.Gray;
myNeedle.Anchor.RadiusMeasure = Infragistics.UltraGauge.Resources.Measure.Percent;
以下の Needle Marker プロパティを設定します。
色 — 255, 61, 22
EndExtent — 65
EndWidth — 1
MidExtent — 0
MidWidth — 3
StartExtent — -20
StartWidth — 3
精度 — 1
値 — 95
WidthMeasure — Percent
Visual Basic の場合:
mySolidFillBrushElement2.Color = System.Drawing.Color.Red
myNeedle.BrushElement = mySolidFillBrushElement2
myNeedle.AllowDrag = True
myNeedle.EndExtent = 65
myNeedle.EndWidth = 1
myNeedle.MidExtent = 0
myNeedle.MidWidth = 3
myNeedle.Precision = 1
myNeedle.StartExtent = -20
myNeedle.StartWidth = 3
myNeedle.Value = 95
myNeedle.WidthMeasure = Measure.Percent
myScale.Markers.Add(myNeedle)
C# の場合:
mySolidFillBrushElement2.Color = System.Drawing.Color.Red;
myNeedle.BrushElement = mySolidFillBrushElement2;
myNeedle.AllowDrag = true;
myNeedle.EndExtent = 65;
myNeedle.EndWidth = 1;
myNeedle.MidExtent = 0;
myNeedle.MidWidth = 3;
myNeedle.Precision = 1;
myNeedle.StartExtent = -20;
myNeedle.StartWidth = 3;
myNeedle.Value = 95;
myNeedle.WidthMeasure = Measure.Percent;
myScale.Markers.Add(myNeedle);
スケールを Scales コレクションに、ゲージを Gauges コレクションに追加します。ゲージの以下のプロパティを設定します。
位置 = (30, 4)
名前 = ultraGauge
サイズ = (250, 240)
TabIndex = 0
Visual Basic の場合:
myRadialGauge.Scales.Add(myScale)
ultraGauge1.Gauges.Add(myRadialGauge)
ultraGauge1.Location = New System.Drawing.Point(30, 4)
ultraGauge1.Name = "ultraGauge1"
ultraGauge1.Size = New System.Drawing.Size(250, 250)
ultraGauge1.TabIndex = 0
Me.Controls.Add(ultraGauge1)
C# の場合:
myRadialGauge.Scales.Add(myScale);
ultraGauge1.Gauges.Add(myRadialGauge);
ultraGauge1.Location = new System.Drawing.Point(30, 4);
ultraGauge1.Name = "ultraGauge1";
ultraGauge1.Size = new System.Drawing.Size(250, 250);
ultraGauge1.TabIndex = 0;
this.Controls.Add(ultraGauge1);
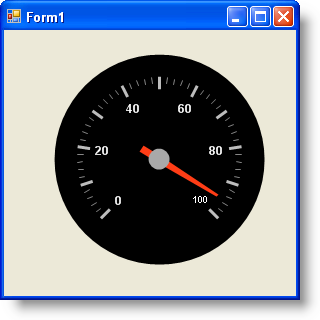
アプリケーションを保存して実行します。以下のフォームのように表示されるはずです。