Imports Infragistics.UltraGauge.Resources

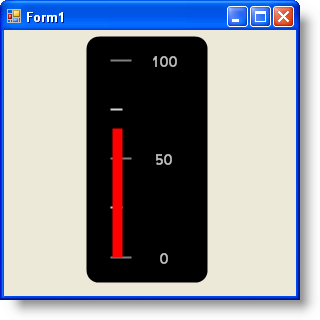
このチュートリアルは、コードを使用してリニア ゲージを作成するプロセスを説明します。この詳細なガイドを完了すると、バー マーカーの付いたリニア ゲージが作成されます。
コードを使用してリニア ゲージを作成するには、次の手順に従ってください。
コードの記述を開始する前にコード ビハインドに using/Imports のディレクティブを配置します。そうすれば、メンバは完全に記述された名前を常にタイプする必要がなくなります。
Visual Basic の場合:
Imports Infragistics.UltraGauge.Resources
C# の場合:
using Infragistics.UltraGauge.Resources;
以下のクラスをインスタンス化します。
Visual Basic の場合:
Dim ultraGauge1 As New Infragistics.Win.UltraWinGauge.UltraGauge()
Dim myLinearGauge As New LinearGauge()
Dim myScale As New LinearGaugeScale()
Dim numericAxis1 As New NumericAxis()
Dim myMarker As New LinearGaugeBarMarker()
Dim mySolidFillBrushElement1 As New SolidFillBrushElement()
Dim mySolidFillBrushElement2 As New SolidFillBrushElement()
Dim mySolidFillBrushElement3 As New SolidFillBrushElement()
Dim mySolidFillBrushElement4 As New SolidFillBrushElement()
Dim mySolidFillBrushElement5 As New SolidFillBrushElement()
Dim mySolidFillBrushElement6 As New SolidFillBrushElement()
C# の場合:
Infragistics.Win.UltraWinGauge.UltraGauge ultraGauge1 = new Infragistics.Win.UltraWinGauge.UltraGauge();
LinearGauge myLinearGauge = new LinearGauge();
LinearGaugeScale myScale = new LinearGaugeScale();
NumericAxis numericAxis1 = new NumericAxis();
LinearGaugeBarMarker myMarker = new LinearGaugeBarMarker();
SolidFillBrushElement mySolidFillBrushElement1 = new SolidFillBrushElement();
SolidFillBrushElement mySolidFillBrushElement2 = new SolidFillBrushElement();
SolidFillBrushElement mySolidFillBrushElement3 = new SolidFillBrushElement();
SolidFillBrushElement mySolidFillBrushElement4 = new SolidFillBrushElement();
SolidFillBrushElement mySolidFillBrushElement5 = new SolidFillBrushElement();
SolidFillBrushElement mySolidFillBrushElement6 = new SolidFillBrushElement();
背景色を黒に設定します。
Visual Basic の場合:
mySolidFillBrushElement1.Color = System.Drawing.Color.Black
myLinearGauge.BrushElement = mySolidFillBrushElement1
C# の場合:
mySolidFillBrushElement1.Color = System.Drawing.Color.Black;
myLinearGauge.BrushElement = mySolidFillBrushElement1;
リニア ゲージの角の範囲と方向を設定します。
Visual Basic の場合:
myLinearGauge.CornerExtent = 10
myLinearGauge.Orientation = LinearOrientation.Vertical
C# の場合:
myLinearGauge.CornerExtent = 10;
myLinearGauge.Orientation = LinearOrientation.Vertical;
軸の終了値を 100 に設定します。
Visual Basic の場合:
numericAxis1.EndValue = 100
myScale.Axes.Add(numericAxis1)
C# の場合:
numericAxis1.EndValue = 100;
myScale.Axes.Add(numericAxis1);
以下の Scale プロパティを設定します。
色 — グレー
EndExtent — 90
InnerExtent — 20
OuterExtent — 30
StartExtent — 10
Visual Basic の場合:
mySolidFillBrushElement2.Color = System.Drawing.Color.Gray
myLinearGauge.BrushElement = mySolidFillBrushElement2
myScale.EndExtent = 90
myScale.InnerExtent = 20
myScale.StartExtent = 10
myScale.OuterExtent = 30
C# の場合:
mySolidFillBrushElement2.Color = System.Drawing.Color.Gray;
myLinearGauge.BrushElement = mySolidFillBrushElement2;
myScale.EndExtent = 90;
myScale.InnerExtent = 20;
myScale.StartExtent = 10;
myScale.OuterExtent = 30;
以下の Labels プロパティを設定します。
色 — シルバー
範囲 — 65
フォント — Trebuchet MS
頻度 — 50
Visual Basic の場合:
mySolidFillBrushElement3.Color = System.Drawing.Color.Silver
myScale.Labels.BrushElement = mySolidFillBrushElement3
myScale.Labels.Extent = 65
myScale.Labels.Font = New System.Drawing.Font("Trebuchet MS", 12.0F, System.Drawing.FontStyle.Bold)
myScale.Labels.Frequency = 50
C# の場合:
mySolidFillBrushElement3.Color = System.Drawing.Color.Silver;
myScale.Labels.BrushElement = mySolidFillBrushElement3;
myScale.Labels.Extent = 65;
myScale.Labels.Font = new System.Drawing.Font("Trebuchet MS", 12F, System.Drawing.FontStyle.Bold);
myScale.Labels.Frequency = 50;
以下の主の Tickmark プロパティを設定します。
色 — グレー
EndExtent — 38
EndWidth — 2
頻度 — 50
StartExtent — 20
StartWidth — 2
Visual Basic の場合:
mySolidFillBrushElement4.Color = System.Drawing.Color.Gray
myScale.MajorTickmarks.BrushElement = mySolidFillBrushElement4
myScale.MajorTickmarks.EndExtent = 38
myScale.MajorTickmarks.EndWidth = 2
myScale.MajorTickmarks.Frequency = 50
myScale.MajorTickmarks.StartExtent = 20
myScale.MajorTickmarks.StartWidth = 2
C# の場合:
mySolidFillBrushElement4.Color = System.Drawing.Color.Gray;
myScale.MajorTickmarks.BrushElement = mySolidFillBrushElement4;
myScale.MajorTickmarks.EndExtent = 38;
myScale.MajorTickmarks.EndWidth = 2;
myScale.MajorTickmarks.Frequency = 50;
myScale.MajorTickmarks.StartExtent = 20;
myScale.MajorTickmarks.StartWidth = 2;
以下の副の Tickmark プロパティを設定します。
色 — ライトグレー
EndExtent — 30
EndWidth — 2
頻度 — 25
StartExtent — 20
StartWidth — 2
Visual Basic の場合:
mySolidFillBrushElement6.Color = System.Drawing.Color.LightGray
myScale.MinorTickmarks.BrushElement = mySolidFillBrushElement6
myScale.MinorTickmarks.EndExtent = 30
myScale.MinorTickmarks.EndWidth = 2
myScale.MinorTickmarks.Frequency = 25
myScale.MinorTickmarks.StartExtent = 20
myScale.MinorTickmarks.StartWidth = 2
C# の場合:
mySolidFillBrushElement6.Color = System.Drawing.Color.LightGray;
myScale.MinorTickmarks.BrushElement = mySolidFillBrushElement6;
myScale.MinorTickmarks.EndExtent = 30;
myScale.MinorTickmarks.EndWidth = 2;
myScale.MinorTickmarks.Frequency = 25;
myScale.MinorTickmarks.StartExtent = 20;
myScale.MinorTickmarks.StartWidth = 2;
以下の Marker プロパティを設定します。
色 — 赤
InnerExtent — 20
OuterExtent — 100
SegmentSpan — 1
StartExtent — 0
値 — 65
Visual Basic の場合:
mySolidFillBrushElement5.Color = System.Drawing.Color.Red
myMarker.BrushElement = mySolidFillBrushElement5
myMarker.InnerExtent = 20
myMarker.OuterExtent = 100
myMarker.SegmentSpan = 1
myMarker.StartExtent = 0
myMarker.Value = 65
myScale.Markers.Add(myMarker)
C# の場合:
mySolidFillBrushElement5.Color = System.Drawing.Color.Red;
myMarker.BrushElement = mySolidFillBrushElement5;
myMarker.InnerExtent = 20;
myMarker.OuterExtent = 100;
myMarker.SegmentSpan = 1;
myMarker.StartExtent = 0;
myMarker.Value = 65;
myScale.Markers.Add(myMarker);
スケールを Scales コレクションに、ゲージを Gauges コレクションに追加します。ゲージの以下のプロパティを設定します。
位置 = (80, 4)
名前 = ultraGauge
サイズ = (125, 250)
TabIndex = 0
Visual Basic の場合:
myLinearGauge.Scales.Add(myScale)
ultraGauge1.Gauges.Add(myLinearGauge)
ultraGauge1.Location = New System.Drawing.Point(80, 4)
ultraGauge1.Name = "ultraGauge1"
ultraGauge1.Size = New System.Drawing.Size(125, 250)
ultraGauge1.TabIndex = 0
Me.Controls.Add(ultraGauge1)
C# の場合:
myLinearGauge.Scales.Add(myScale);
ultraGauge1.Gauges.Add(myLinearGauge);
ultraGauge1.Location = new System.Drawing.Point(80, 4);
ultraGauge1.Name = "ultraGauge1";
ultraGauge1.Size = new System.Drawing.Size(125, 250);
ultraGauge1.TabIndex = 0;
this.Controls.Add(ultraGauge1);
アプリケーションを保存して実行します。以下のフォームのように表示されるはずです。