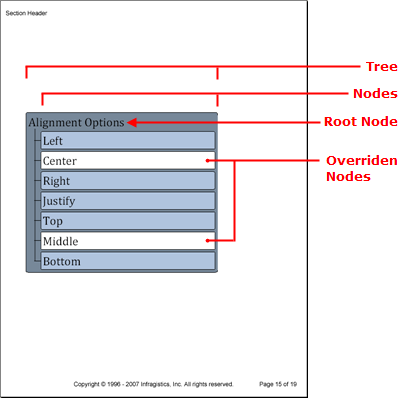

Tree エレメントは、親ノード、特にルート ノードが子ノードと階層の下位にあるすべてのノードをどのように所有するかを示すことによって、階層関係を表示するために役に立ちます。Tree エレメントのオブジェクト モデルは、ツリーのルート ノードを識別するために Root プロパティを設定したメインのツリー オブジェクトで構成されています。ルート ノード(タイプ INode の)への参照を取得したら、INode インターフェイスから AddNode メソッドを呼び出して、追加ノードをツリーに追加することができます。希望の数だけノードを追加できますが、ルート ノードはひとつしかありません。
すべての パターン コンテンツと同じように、パターンを以下のツリー エレメントに追加することによって、スタイル変更を実装できます。
ツリー全体( TreePattern クラスはスタイルを ITree インターフェイスに適用)
コンテンツではなくツリーのノード( TreeNodePattern クラスはスタイルを INode インターフェイスを適用)
ツリー ノードのキャプション( TreeCaptionPattern クラスはスタイルを ICaption インターフェイスに適用)
上記のリストから分かるように、各パターンはツリーのより詳細な階層に適用されます。それでも十分でない場合には、各ノードで特定のプロパティを設定せうることにより、各パターンをオーバーライドすることができます。
以下のコードはルート ノードがひとつ、子ノードが 7 つのツリーを作成します。最初にツリー、ノード、キャプションのパターンを作成し、ツリーを作成して、次にノードを追加します。
ツリー、ノード、キャプションのパターンを作成します。
Visual Basic の場合:
Imports Infragistics.Documents.Reports.Reports.Report
.
.
.
' ツリー全体の新しいパターンを作成します。
Dim treePattern As New Infragistics.Documents.Reports.Reports.Report.Tree.TreePattern()
treePattern.Background = New Background(Brushes.LightSlateGray)
treePattern.Paddings = New Paddings(5)
treePattern.Borders = New Borders(New Pen(New Color(0, 0, 0)), 5)
' ツリー ノードの新しいパターンを作成します。
Dim treeNodePattern As New Infragistics.Documents.Reports.Reports.Report.Tree.TreeNodePattern()
treeNodePattern.Lines = New Lines(New Pen(New Color(0, 0, 0)))
treeNodePattern.Interval = 5
treeNodePattern.Indent = 25
' キャプションの新しいパターンを作成します。
Dim treeCaptionPattern As New Infragistics.Documents.Reports.Reports.Report.Tree.TreeCaptionPattern()
treeCaptionPattern.Background = New Background(Brushes.LightSteelBlue)
treeCaptionPattern.Borders = New Borders(New Pen(New Color(0, 0, 0)), 3)
treeCaptionPattern.Paddings = New Paddings(3)
C# の場合:
using Infragistics.Documents.Reports.Reports.Report;
.
.
.
// ツリー全体の新しいパターンを作成します。
Infragistics.Documents.Reports.Reports.Report.Tree.TreePattern treePattern = new TreePattern();
treePattern.Background = new Background(Brushes.LightSlateGray);
treePattern.Paddings = new Paddings(5);
treePattern.Borders = new Borders(new Pen(new Color(0, 0, 0)), 5);
// ツリー ノードの新しいパターンを作成します。
Infragistics.Documents.Reports.Reports.Report.Tree.TreeNodePattern treeNodePattern = new TreeNodePattern();
treeNodePattern.Lines = new Lines(new Pen(new Color(0, 0, 0)));
treeNodePattern.Interval = 5;
treeNodePattern.Indent = 25;
// キャプションの新しいパターンを作成します。
Infragistics.Documents.Reports.Reports.Report.Tree.TreeCaptionPattern treeCaptionPattern = new TreeCaptionPattern();
treeCaptionPattern.Background = new Background(Brushes.LightSteelBlue);
treeCaptionPattern.Borders = new Borders(new Pen(new Color(0, 0, 0)), 3);
treeCaptionPattern.Paddings = new Paddings(3);
ツリーを作成し、ツリー パターンを適用して、次にルート ノードのキャプションを追加します。
Visual Basic の場合:
' ツリーを作成してツリーのルート ノードへの
' 参照を取得します。
Dim tree As Infragistics.Documents.Reports.Reports.Report.Tree.ITree = section1.AddTree()
tree.ApplyPattern(treePattern)
tree.Width = New RelativeWidth(75)
Dim rootNode As Infragistics.Documents.Reports.Reports.Report.Tree.INode = tree.Root
treeNodePattern.Apply(rootNode)
Dim nodeText As Infragistics.Documents.Reports.Reports.Report.QuickText.IQuickText
' キャプションをルート ノードに追加します。
Dim rootCaption As Infragistics.Documents.Reports.Reports.Report.Tree.ICaption = rootNode.Caption
nodeText = rootCaption.AddQuickText("Alignment Options")
nodeText.Font = New Infragistics.Documents.Reports.Reports.Graphics.Font("Verdana", 24)
C# の場合:
// ツリーを作成してツリーのルート ノードへの
// 参照を取得します。
Infragistics.Documents.Reports.Reports.Report.Tree.ITree tree = section1.AddTree();
tree.ApplyPattern(treePattern);
tree.Width = new RelativeWidth(75);
Infragistics.Documents.Reports.Reports.Report.Tree.INode rootNode = tree.Root;
treeNodePattern.Apply(rootNode);
Infragistics.Documents.Reports.Reports.Report.QuickText.IQuickText nodeText;
// キャプションをルート ノードに追加します。
Infragistics.Documents.Reports.Reports.Report.Tree.ICaption rootCaption = rootNode.Caption;
nodeText = rootCaption.AddQuickText("Alignment Options");
nodeText.Font = new Infragistics.Documents.Reports.Reports.Graphics.Font("Verdana", 24);
子ノードを作成します。
以下のコードは、 Alignment 列挙体でループしてツリー ノードを格納するための文字列を取得します。ループが文字列「Center」または「Middle」に遭遇すると、これらのノードのパターンをオーバーライドして背景色を白に変更します。
Visual Basic の場合:
Dim childNode As Infragistics.Documents.Reports.Reports.Report.Tree.INode;
Dim childNodeCaption As Infragistics.Documents.Reports.Reports.Report.Tree.ICaption;
For Each s As String In [Enum].GetNames(GetType(Alignment))
	If s = "Center" OrElse s = "Middle" Then
		childNode = rootNode.AddNode()
		childNodeCaption = childNode.Caption
		treeCaptionPattern.Apply(childNodeCaption)
		' TreeCaptionPattern の背景をオーバーライドします。
		childNodeCaption.Background = New Background(Brushes.White)
		nodeText = childNodeCaption.AddQuickText(s)
		nodeText.Font = New Infragistics.Documents.Reports.Reports.Graphics.Font("Verdana", 24)
	Else
		childNode = rootNode.AddNode()
		childNodeCaption = childNode.Caption
		treeCaptionPattern.Apply(childNodeCaption)
		nodeText = childNodeCaption.AddQuickText(s)
		nodeText.Font = New Infragistics.Documents.Reports.Reports.Graphics.Font("Verdana", 24)
	End If
Next s
C# の場合:
INode childNode;
ICaption childNodeCaption;
foreach (string s in Enum.GetNames(typeof(Alignment)))
{
	if (s == "Center" || s == "Middle")
	{
		childNode = rootNode.AddNode();
		childNodeCaption = childNode.Caption;
		treeCaptionPattern.Apply(childNodeCaption);
		// TreeCaptionPattern の背景をオーバーライドします。
		childNodeCaption.Background = new Background(Brushes.White);
		nodeText = childNodeCaption.AddQuickText(s);
		nodeText.Font = new Infragistics.Documents.Reports.Reports.Graphics.Font("Verdana", 24);
	}
	else
	{
		childNode = rootNode.AddNode();
		childNodeCaption = childNode.Caption;
		treeCaptionPattern.Apply(childNodeCaption);
		nodeText = childNodeCaption.AddQuickText(s);
		nodeText.Font = new Infragistics.Documents.Reports.Reports.Graphics.Font("Verdana", 24);
	}
}