Imports Infragistics.Win.UltraWinGrid

表示データが、水平スクロール バーを配備しないと単一の WinGrid 行に収まらないほどになることがよくあります。AutoFitColumns プロパティを True に設定してもよいですが、列が多いときはそれほど役に立ちません。水平スクロール バーを使えば全てのセルを表示することができますが、多くのアプリケーションでこれは使い勝手がよくありません。
使い勝手を向上させるため、UltraWinGrid では開発者がセルをグループ内のグループとレベルに配置することができます。こうしてデータを水平スクロール バーを使わないで表示することができます。
単一バンドのデータを複数行のグリッドにどのように表示しますか?
UltraWinGrid の Groups と Levels プロパティを使って、バンドのセルを配置します。
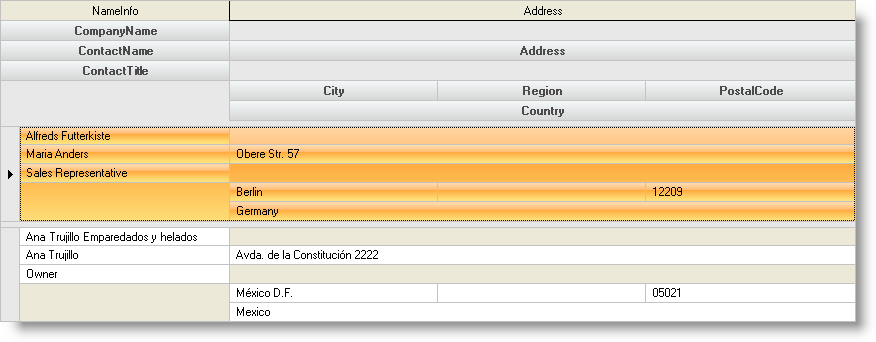
このサンプル プロジェクトでは、顧客の名前、住所、売上データを 2 つの異なるグリッドに表示します。最初のグリッドはセルの配置がなく、2 番目のグリッドはセルを 2 つのグループおよび最大 5 レベルに編成しています。
コードの記述を開始する前にコード ビハインドに使用/インポートのディレクティブを配置します。そうすれば、メンバは完全に記述された名前を常に入力する必要がなくなります。
Visual Basic の場合:
Imports Infragistics.Win.UltraWinGrid
C# の場合:
using Infragistics.Win.UltraWinGrid;
UltraWinGrid イベント領域には次のイベント ハンドラが含まれます。
UltraGrid2.InitializeLayout - UltraGrid2 InitializeLayout イベントには セルを配置し、UltraWinGrid の書式設定をするコードが記述されています。
Visual Basic の場合:
Private Sub UltraGrid1_InitializeLayout(ByVal sender As Object, _
  ByVal e As Infragistics.Win.UltraWinGrid.InitializeLayoutEventArgs) _
  Handles UltraGrid1.InitializeLayout
	' AutoFitStyle を設定してすべての列のサイズを変更し、各行の前に
	' 5 ピクセルのスペースを配置します
	Me.UltraGrid1.DisplayLayout.AutoFitStyle = AutoFitStyle.ResizeAllColumns
	Me.UltraGrid1.DisplayLayout.Override.RowSpacingBefore = 5
	' 2 つのグループを追加します。ひとつは NameInfo セルで、
	' もうひとつは Address セルです
	Me.UltraGrid1.DisplayLayout.Bands(0).Groups.Add("NameInfo")
	Me.UltraGrid1.DisplayLayout.Bands(0).Groups.Add("Address")
	' levelcount を各グループが持つことのできるレベルの数に設定します
	Me.UltraGrid1.DisplayLayout.Bands(0).LevelCount = 5
	' Name グループの各セルに Group プロパティと Level プロパティを設定します
	Me.UltraGrid1.DisplayLayout.Bands(0).Columns("CompanyName").Group = _
	  Me.UltraGrid1.DisplayLayout.Bands(0).Groups("NameInfo")
	Me.UltraGrid1.DisplayLayout.Bands(0).Columns("CompanyName").Level = 0
	Me.UltraGrid1.DisplayLayout.Bands(0).Columns("ContactName").Group = _
	  Me.UltraGrid1.DisplayLayout.Bands(0).Groups("NameInfo")
	Me.UltraGrid1.DisplayLayout.Bands(0).Columns("ContactName").Level = 1
	Me.UltraGrid1.DisplayLayout.Bands(0).Columns("ContactTitle").Group = _
	  Me.UltraGrid1.DisplayLayout.Bands(0).Groups("NameInfo")
	Me.UltraGrid1.DisplayLayout.Bands(0).Columns("ContactTitle").Level = 2
	' Address グループの各セルに Group プロパティと Level プロパティを設定します
	Me.UltraGrid1.DisplayLayout.Bands(0).Columns("Address").Group = _
	  Me.UltraGrid1.DisplayLayout.Bands(0).Groups("Address")
	Me.UltraGrid1.DisplayLayout.Bands(0).Columns("Address").Level = 1
	Me.UltraGrid1.DisplayLayout.Bands(0).Columns("City").Group = _
	  Me.UltraGrid1.DisplayLayout.Bands(0).Groups("Address")
	Me.UltraGrid1.DisplayLayout.Bands(0).Columns("City").Level = 3
	Me.UltraGrid1.DisplayLayout.Bands(0).Columns("Region").Group = _
	  Me.UltraGrid1.DisplayLayout.Bands(0).Groups("Address")
	Me.UltraGrid1.DisplayLayout.Bands(0).Columns("Region").Level = 3
	Me.UltraGrid1.DisplayLayout.Bands(0).Columns("PostalCode").Group = _
	  Me.UltraGrid1.DisplayLayout.Bands(0).Groups("Address")
	Me.UltraGrid1.DisplayLayout.Bands(0).Columns("PostalCode").Level = 3
	Me.UltraGrid1.DisplayLayout.Bands(0).Columns("Country").Group = _
	  Me.UltraGrid1.DisplayLayout.Bands(0).Groups("Address")
	Me.UltraGrid1.DisplayLayout.Bands(0).Columns("Country").Level = 4
End Sub
C# の場合:
private void ultraGrid1_InitializeLayout(object sender,
  Infragistics.Win.UltraWinGrid.InitializeLayoutEventArgs e)
{
	// AutoFitStyle を設定してすべての列のサイズを変更し、各行の前に
	// 5 ピクセルのスペースを配置します
	this.ultraGrid1.DisplayLayout.AutoFitStyle = AutoFitStyle.ResizeAllColumns;
	this.ultraGrid1.DisplayLayout.Override.RowSpacingBefore = 5;
	// 2 つのグループを追加します。ひとつは NameInfo セルで、
	//もうひとつは Address セルです
	this.ultraGrid1.DisplayLayout.Bands[0].Groups.Add("NameInfo");
	this.ultraGrid1.DisplayLayout.Bands[0].Groups.Add("Address");
	// levelcount を各グループが持つことのできるレベルの数に設定します
	this.ultraGrid1.DisplayLayout.Bands[0].LevelCount = 5;
	// Name グループの各セルに Group プロパティと Level プロパティを設定します
	this.ultraGrid1.DisplayLayout.Bands[0].Columns["CompanyName"].Group =
	this.ultraGrid1.DisplayLayout.Bands[0].Groups["NameInfo"];
	this.ultraGrid1.DisplayLayout.Bands[0].Columns["CompanyName"].Level = 0;
	this.ultraGrid1.DisplayLayout.Bands[0].Columns["ContactName"].Group =
	this.ultraGrid1.DisplayLayout.Bands[0].Groups["NameInfo"];
	this.ultraGrid1.DisplayLayout.Bands[0].Columns["ContactName"].Level = 1;
	this.ultraGrid1.DisplayLayout.Bands[0].Columns["ContactTitle"].Group =
	this.ultraGrid1.DisplayLayout.Bands[0].Groups["NameInfo"];
	this.ultraGrid1.DisplayLayout.Bands[0].Columns["ContactTitle"].Level = 2;
	// Address グループの各セルに Group プロパティと Level プロパティを設定します
	this.ultraGrid1.DisplayLayout.Bands[0].Columns["Address"].Group =
	this.ultraGrid1.DisplayLayout.Bands[0].Groups["Address"];
	this.ultraGrid1.DisplayLayout.Bands[0].Columns["Address"].Level = 1;
	this.ultraGrid1.DisplayLayout.Bands[0].Columns["City"].Group =
	this.ultraGrid1.DisplayLayout.Bands[0].Groups["Address"];
	this.ultraGrid1.DisplayLayout.Bands[0].Columns["City"].Level = 3;
	this.ultraGrid1.DisplayLayout.Bands[0].Columns["Region"].Group =
	this.ultraGrid1.DisplayLayout.Bands[0].Groups["Address"];
	this.ultraGrid1.DisplayLayout.Bands[0].Columns["Region"].Level = 3;
	this.ultraGrid1.DisplayLayout.Bands[0].Columns["PostalCode"].Group =
	this.ultraGrid1.DisplayLayout.Bands[0].Groups["Address"];
	this.ultraGrid1.DisplayLayout.Bands[0].Columns["PostalCode"].Level = 3;
	this.ultraGrid1.DisplayLayout.Bands[0].Columns["Country"].Group =
	this.ultraGrid1.DisplayLayout.Bands[0].Groups["Address"];
	this.ultraGrid1.DisplayLayout.Bands[0].Columns["Country"].Level = 4;
}
このサンプル プロジェクトは、Groups と Levels を使用してセルを読みやすい表示書式に整える方法を説明しています。