バージョン

フロー

Flow エレメントはレポートで列を定義するために非常に役に立ちます。列の定義を支援する Flow エレメント固有のオブジェクトは 2 つあります。

IFlowColumn インターフェイス

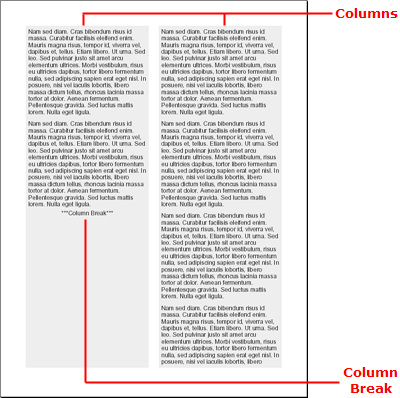
link:Infragistics.webui.documents.reports~infragistics.documents.reports.report.flow.iflowcolumn.html[IFlowColumn]      インターフェイスはフローで列を定義します。希望する数だけ列を追加することができます。列は、作成される順序で追加されます。各列はそれ自体個別のセクションを表すものではありません。Flow エレメントのコンテンツがセクションでどのようにフローするのかを表すだけです。したがって、個別のコンテンツを個々の列に追加できません。ただし、   link:Infragistics.webui.documents.reports~infragistics.documents.reports.report.flow.iflow~addcolumnbreak.html[AddColumnBreak]      メソッドを使用してどの列にどのコンテンツを表示するのかをある程度制御できます。

AddColumnBreak メソッド

link:Infragistics.webui.documents.reports~infragistics.documents.reports.report.flow.iflow.html[IFlow]      オブジェクトでこのメソッドを呼び出すと、フロー内の特定の位置に列の区切りを挿入します。このメソッドを使用すると、フローに追加したさまざまなコンテンツのタイプを分割できます。テキスト、次に列の区切り、次に画像、別の列の区切り、そしてさらにテキストを追加できます。このパターンによって、画像がテキストのない中央の列に常に配置されることが保証されます。
Flow.png

Flow エレメントの作成

この詳細なガイドでは、列が 2 つある Flow エレメントの作成を説明します。Flow エレメントには、テキストのパラグラフが 5 つ含まれており、それぞれが FOR ループに追加されています。2 番目のパラグラフの後ろに列の区切りが追加されます(IF ステートメントによって実行される)。この FOR ループと IF ステートメントのロジックは、コレクション内にいくつかの同じような項目がある場合に固有のレポートに適用できますが、特定の項目の後に列の区切りを追加する必要があります。

次の手順を実行します

  1. レポートとメインのセクションを作成します。

あらゆるレポートは、Report オブジェクトをインスタンス化することによって開始します。Report エレメントを取得したら、Section エレメントを追加できます。Section エレメントには Flow エレメントが含まれます。

Visual Basic の場合:

Imports Infragistics.Documents.Reports.Reports.Report
.
.
.
' 新しいレポートを作成します。
Dim report As Infrgistics.Documents.Report.Report = New Report()
' メインの Section を作成し、各端に 50 ピクセルの
' パディングを追加します。
Dim section1 As Infragistics.Documents.Reports.Reports.Report.Section.ISection = report.AddSection()
section1.PagePaddings.All = 50

C# の場合:

using Infragistics.Documents.Reports.Reports.Report;
.
.
.
// 新しいレポートを作成します。
Infragistics.Documents.Reports.Reports.Report.Report report = new Report();
// メインの Section を作成し、各端に 50 ピクセルの
// パディングを追加します。
Infragistics.Documents.Reports.Reports.Report.Section.ISection section1 = report.AddSection();
section1.PagePaddings.All = 50;
  1. Flow エレメントと列を作成します。

Section オブジェクトの AddFlow メソッドを呼び出すことによって、Flow エレメントをインスタンス化します。AddFlow メソッドは新しい Flow オブジェクトを返します。Flow オブジェクトの AddColumn メソッドを呼び出すことによって、Column エレメントに対して同じことを実行します。これによって、新しい列が Flow エレメントに追加されます。次に 2 列の合計に対して列をもう 1 列作成します。

Visual Basic の場合:

' Flow エレメントをメインのセクションに追加します。
Dim flow As Infragistics.Documents.Reports.Reports.Report.Flow.IFlow = section1.AddFlow()
' Flow エレメントで列を作成します。
Dim column As Infragistics.Documents.Reports.Reports.Report.Flow.IFlowColumn = flow.AddColumn()
' 列の幅はページの幅の 50% に
' なります。
column.Width = New RelativeWidth(50)
' gudder をシミュレートするために右端にスペースを
' 追加します。
column.Margins.Right = 10
' 列の背景をグレーにします。
column.Background = New Background(New Color(238, 238, 238))
' もう 1 列 Flow エレメントに追加します。
column = flow.AddColumn()
' 列の幅はページの幅の 50% に
' なります。
column.Width = New RelativeWidth(50)
' gudder をシミュレートするために左端にスペースを
' 追加します。
column.Margins.Left = 10
' 列の背景をグレーにします。
column.Background = New Background(New Color(238, 238, 238))

C# の場合:

// Flow エレメントをメインのセクションに追加します。
Infragistics.Documents.Reports.Reports.Report.Flow.IFlow flow = section1.AddFlow();
// Flow エレメントで列を作成します。
Infragistics.Documents.Reports.Reports.Report.Flow.IFlowColumn column = flow.AddColumn();
// 列の幅はページの幅の 50% になります。
column.Width = new RelativeWidth(50);
// gudder をシミュレートするために右端にスペースを追加します。
column.Margins.Right = 10;
// 列の背景をグレーにします。
column.Background = new Background(new Color(238, 238, 238));
// もう 1 列 Flow エレメントに追加します。
column = flow.AddColumn();
// 列の幅はページの幅の 50% になります。
column.Width = new RelativeWidth(50);
// gudder をシミュレートするために左端にスペースを追加します。
column.Margins.Left = 10;
// 列の背景をグレーにします。
column.Background = new Background(new Color(238, 238, 238));
  1. コンテンツを Flow エレメントに追加します。

これで 2 列になったので、テキストを列に追加します。FOR ループによって 5 つのテキストのパラグラフを追加します。FOR ループでは、IF ステートメントを使用して 2 番目のパラグラフの後ろに列の区切りを挿入します。

以下のテキストを使用して、string1 変数を設定します。

Lorem ipsum dolor sit amet, consectetuer adipiscing elit. Donec imperdiet mattis sem. Nunc ornare elit at justo. In quam nulla, lobortis non, commodo eu, eleifend in, elit. Nulla eleifend. Nulla convallis. Sed eleifend auctor purus. Donec velit diam, congue quis, eleifend et, pretium id, tortor. Nulla semper condimentum justo. Etiam interdum odio ut ligula. Vivamus egestas scelerisque est. Donec accumsan. In est urna, vehicula non, nonummy sed, malesuada nec, purus. Vestibulum erat. Vivamus lacus enim, rhoncus nec, ornare sed, scelerisque varius, felis. Nam eu libero vel massa lobortis accumsan. Vivamus id orci. Sed sed lacus sit amet nibh pretium sollicitudin. Morbi urna.

Visual Basic の場合:

Dim string1 As String = "Lorem ipsum..."
' Text エレメントを作成します。
Dim [text] As Infragistics.Documents.Reports.Reports.Report.Text.IText
' 5 回繰り返す FOR ループを作成します。
For i As Integer = 0 To 4
	' 3 回目の繰り返しで、列の区切りを追加します。
	If i = 2 Then
		Dim columnBreak As Infragistics.Documents.Reports.Reports.Report.Text.IText = flow.AddText()
		columnBreak.Alignment = New TextAlignment(Alignment.Center, Alignment.Middle)
		columnBreak.AddContent("$$*$$$$*$$$$*$$Column Break$$*$$$$*$$$$* $$")
		flow.AddColumnBreak()
		[text] = flow.AddText()
		[text].Paddings = New Paddings(5)
		[text].AddContent(string1)
	Else
		[text] = flow.AddText()
		[text].Paddings = New Paddings(5)
		[text].AddContent(string1)
	End If
Next i
' Flow エレメント(コンテンツではない)をページの下部まで
' 引き伸ばします。
flow.AddStretcher()

C# の場合:

string string1 = "Lorem ipsum...";
// Text エレメントを作成します。
Infragistics.Documents.Reports.Reports.Report.Text.IText text;
// 5 回繰り返す FOR ループを作成します。
for (int i = 0; i < 5; i++)
{
	// 3 回目の繰り返しで、列の区切りを追加します。
	if (i == 2)
	{
		Infragistics.Documents.Reports.Reports.Report.Text.IText columnBreak = flow.AddText();
		columnBreak.Alignment = new TextAlignment(Alignment.Center, Alignment.Middle);
		columnBreak.AddContent("$$*$$$$*$$$$*$$Column Break$$*$$$$*$$$$* $$");
		flow.AddColumnBreak();
		text = flow.AddText();
		text.Paddings = new Paddings(5);
		text.AddContent(string1);
	}
	else
	{
		text = flow.AddText();
		text.Paddings = new Paddings(5);
		text.AddContent(string1);
	}
}
// Flow エレメント(コンテンツではない)をページの下部まで
// 引き伸ばします。
flow.AddStretcher();