階層グリッド ロードオンデマンド
IgxHierarchicalGrid は、要求するサーバーからのデータを最低限にすることによりすばやく描画できます。このため、ユーザーがビューで結果を確認でき、表示データをインタラクティブに操作できます。初期時にグリッドのデータのみが取得されて描画され、ユーザーが子グリッドを含む行を拡張した後のみ、特定の子グリッドのデータを取得します。このメカニズムはロードオンデマンドであらゆるリモートデータとの設定が簡単にできます。
このトピックでは、データを Northwind WebAPI に要求してロードオンデマンドを構成する方法を説明します。以下は、デモと作成手順を示します。
Angular 階層グリッド ロードオンデマンドの例
階層グリッドのセットアップ
階層グリッドのセットアップを行いましょう。
最初に階層グリッド テンプレートを必要な階層レベルで定義します。ルート グリッド (顧客データ) の primaryKey は customerId、第 1 階層の注文データでは orderId、さらにその詳細には productId をそれぞれ主キーとして使用します。各データベース テーブルとキーで初期テンプレートを定義します。
<igx-hierarchical-grid #hGrid [primaryKey]="'customerId'" [autoGenerate]="true" [height]="'600px'" [width]="'100%'">
    <igx-row-island [key]="'Orders'" [primaryKey]="'orderId'" [autoGenerate]="true">
        <igx-row-island [key]="'Details'" [primaryKey]="'productId'" [autoGenerate]="true">
        </igx-row-island>
    </igx-row-island>
</igx-hierarchical-grid>
コードでエンドポイントからデータを取得後に、#hGrid 参照を使用して、ルート グリッドのデータを簡単に設定できます。展開されている子にデータを設定する方法は異なります。
行がはじめて展開されたときに新しく子グリッド IgxHierarchicalGrid が描画されるため、データを設定するために新しく作成されたグリッドの参照を取得する必要があります。そのため、各 IgxRowIsland コンポーネントは、特定の子アイランドに新しい子グリッドが作成されたときに発生する gridCreated イベントを提供します。このイベントを使用して、新しいグリッドの参照を取得し、エンドポイントにデータを要求して適用することができます。
エンドポイントには、行アイランドのキー、親行の主キー、およびその一意の識別子のみが必要なため、すべての行アイランドに対して同じメソッドを使用できます。このすべての情報は、イベント引数から直接アクセスできます。
読み込みインジケーターの設定
空グリッドを表示する代わりに、データがまだ読み込み中であることをユーザーに示すことで、ユーザー エクスペリエンスを向上させることができます。その目的で、IgxHierarchicalGrid は、グリッドが空のときに表示できる読み込みインジケーターをサポートします。
データが存在しない間は、isLoading プロパティを true に設定することで読み込みインジケーターを表示します。データが読み込まれるまでルートグリッドにあらかじめ設定しますが、新しい子グリッドを作成する際にも必要です。テンプレートでは常にこれを true に設定できますが、サービスが空の配列を返す場合はインジケーターを非表示にして (false に設定して)、グリッドにデータがないことを表示します。
最後に、autoGenerate プロパティを false に設定にし、マークアップで列コレクションを定義します。
すべての変更を加えたテンプレート ファイル hierarchical-grid-lod.component.html は以下のようになります。
    <igx-hierarchical-grid #hGrid [data]="remoteData" [isLoading]="true" [primaryKey]="'customerId'" [autoGenerate]="false" [height]="'580px'" [width]="'100%'" [igxPreventDocumentScroll]="true" [allowAdvancedFiltering]="true" [schema]="schema" (advancedFilteringExpressionsTreeChange)="refreshRootGridData()">
            <igx-grid-toolbar></igx-grid-toolbar>

            <igx-column field="customerId" [dataType]="'string'"></igx-column>
            <igx-column field="companyName" [dataType]="'string'"></igx-column>
            <igx-column field="contactName" [dataType]="'string'"></igx-column>
            <igx-column field="contactTitle" [dataType]="'string'"></igx-column>

        <igx-row-island #rowIsland1 [key]="'Orders'" [primaryKey]="'orderId'" [autoGenerate]="false" (gridCreated)="gridCreated($event)">
            <igx-column field="orderId"></igx-column>
            <igx-column field="customerId"></igx-column>
            <igx-column field="shipVia"></igx-column>
            <igx-column field="freight"></igx-column>

            <igx-row-island #rowIsland2 [key]="'Details'" [primaryKey]="'orderId'" [autoGenerate]="false" (gridCreated)="gridCreated($event)">
                <igx-column field="orderId"></igx-column>
                <igx-column field="productId"></igx-column>
                <igx-column field="unitPrice"></igx-column>
                <igx-column field="quantity"></igx-column>
                <igx-column field="discount"></igx-column>
            </igx-row-island>
        </igx-row-island>
    </igx-hierarchical-grid>
高度なフィルタリング
ロードオンデマンドで IgxHierarchicalGrid の高度なフィルタリングを使用するには、グリッドの schema プロパティを、階層構造を持つエンティティに設定し、子エンティティとフィールドをそのデータ タイプで指定する必要があります。これにより、子グリッドのデータが読み込まれる前にネストされたクエリを含むフィルタリング式を作成でき、グリッドはこれらのフィルタをデータに正しく解釈して適用することができます。
この例では、これが正しい階層構造です:
public schema: EntityType[] = [
    {
        name: 'Customers',
        fields: [
            { field: 'customerId', dataType: 'string' },
            { field: 'companyName', dataType: 'string' },
            { field: 'contactName', dataType: 'string' },
            { field: 'contactTitle', dataType: 'string' }
        ],
        childEntities: [
            {
                name: 'Orders',
                fields: [
                    { field: 'customerId', dataType: 'string' },
                    { field: 'orderId', dataType: 'number' },
                    { field: 'employeeId', dataType: 'number' },
                    { field: 'shipVia', dataType: 'string' },
                    { field: 'freight', dataType: 'number' }
                ],
                childEntities: [
                    {
                        name: 'Details',
                        fields: [
                            { field: 'orderId', dataType: 'number' },
                            { field: 'productId', dataType: 'number' },
                            { field: 'unitPrice', dataType: 'number' },
                            { field: 'quantity', dataType: 'number' },
                            { field: 'discount', dataType: 'number' }
                        ]
                    }
                ]
            }
        ]
    }
];
初期フィルターの設定
ルート グリッドが最初に読み込まれたときにフィルター処理されるように、グリッドに初期フィルタリング ルールを追加しましょう。FilteringExpressionsTree を作成し、ngOnInit ライフサイクル フックを使用して IgxHierarchicalGrid の advancedFilteringExpressionsTree プロパティに設定します。
例えば、注文の運賃が少なくとも 500 である顧客をフィルタリングするとします。フィルタリング式でネストされたクエリを作成する機能を利用すると、次のようになります:
public ngOnInit() {
    const ordersTree = new FilteringExpressionsTree(FilteringLogic.And, undefined, 'Orders', ['customerId']);
    ordersTree.filteringOperands.push({
        fieldName: 'freight',
        ignoreCase: false,
        condition: IgxNumberFilteringOperand.instance().condition('greaterThanOrEqualTo'),
        conditionName: IgxNumberFilteringOperand.instance().condition('greaterThanOrEqualTo').name,
        searchVal: '500'
    });

    const customersTree = new FilteringExpressionsTree(FilteringLogic.And, undefined, 'Customers', ['customerId', 'companyName', 'contactName', 'contactTitle']);
    customersTree.filteringOperands.push({
        fieldName: 'customerId',
        condition: IgxStringFilteringOperand.instance().condition('inQuery'),
        conditionName: IgxStringFilteringOperand.instance().condition('inQuery').name,
        ignoreCase: false,
        searchTree: ordersTree
    });
    this.hGrid.advancedFilteringExpressionsTree = customersTree;
}
エンドポイントへの接続
ブラウザーが提供する XMLHttpRequest インターフェイス を使用して、HTTP プロトコルでエンドポイントと通信します。これをより簡単に行うために、簡素化されたクライアント HTTP API を提供する Angular の HttpClient モジュールを使用します。
ルート グリッド データの取得
Northwind WebAPI は、IFilteringExpressionsTree をパラメーターとして受け入れる POST エンドポイントを提供します。これを使用して、IgxHierarchicalGrid の高度なフィルタリング機能を活用し、ルート グリッドのレコードをフィルターします。これを refreshRootGridData メソッドで実行します。
public refreshRootGridData() {
    const tree = this.hGrid.advancedFilteringExpressionsTree;
    this.hGrid.isLoading = true;
    if (tree) {
        this.http.post(`${API_ENDPOINT}/QueryBuilder/ExecuteQuery`, tree).subscribe(data =>{
            this.remoteData = Object.values(data)[0];
            this.hGrid.isLoading = false;
            this.hGrid.cdr.detectChanges();
        });
    } else {
        this.http.get(`${API_ENDPOINT}/Customers`).subscribe(data => {
            this.remoteData = Object.values(data);
            this.hGrid.isLoading = false;
            this.hGrid.cdr.detectChanges();
        });
    }
}
ご覧のとおり、this.http は HttpCLient モジュールへの参照になります。subscribe メソッドは Angular の Observable の一部であり、HTTP リクエストからの非同期応答を処理するために使用されます。データが受信されると、取得したデータを関連するグリッドに割り当て、読み込み状態を false に更新し、変更検出をトリガーして UI に変更が反映されるようにします。
ルート グリッドが初期表示された後にデータを読み込むために、ngAfterViewInit ライフサイクル フックを使用して refreshRootGridData メソッドを呼び出します。
public ngAfterViewInit() {
    this.refreshRootGridData();
}
子グリッド データの取得
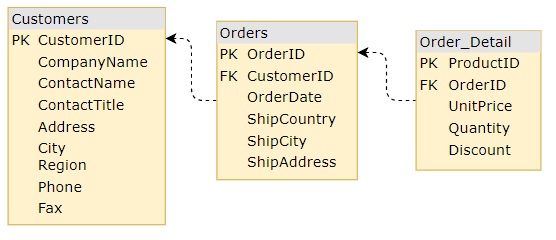
次に、子グリッドのデータを取得するために、GET リクエストの URL をどのように構築するかを定義します。これはテーブル間の関係を視覚的に表現したものです。

最後に、作成された新しい子グリッドのデータを要求する gridCreated メソッドを実装する必要があります。これはルート レベルのグリッド データを取得する場合と似ていますが、今回はイベント gridCreated で提供されたデータを使用し、それを使用して URL を構築します。
public gridCreated(event: IGridCreatedEventArgs) {
    event.grid.isLoading = true;
    const url = this.buildUrl(event);
    this.http.get(url).subscribe(data => {
        event.grid.data = Object.values(data);
        event.grid.isLoading = false;
        this.hGrid.cdr.detectChanges();
    });
}

private buildUrl(event: IGridCreatedEventArgs) {
    const parentKey = (event.grid.parent as any).key ?? this.schema[0].name;
    const url = `${API_ENDPOINT}/${parentKey}/${event.parentID}/${event.owner.key}`;
    return url;
}